

|
Need a break?
Intelligent Gifts for Collegues to use while coding PHP @
Get Hard Copy News Delivered |


|
Install PHP 5.3.5 on Microsoft Windows
A Self Paced PHP5 Certification Course for under $15* per month! Enroll NOW! |
||
|
Review Changes made to Apache's httpd.conf by PHP 5.3.5 installation:Before testing you must ensure your httpd.conf file is correctly configured. The Php 5.3.5 installer is inclined to overwrite your php path information with invalid data (Review the apache guide if you need assistance in how to locate and edit this file.) Apache-cgi httpd.conf file edits (to manually config httpd.conf): If you selected Apache CGI (or Other-CGI in the -nts- install), you will need to verify if php's changes to your httpd.conf file is correct in two places. If the PHP modifications are not correct, then amend your apache httpd.conf file by following the included instructions and manually config httpd.conf file your self. Change 1) With no forward slash at the end, and assuming your Php install path is "C:/PHP", use a text editor (like notepad, not Ms Word), find (search) the note that says "cgi-bin should be changed to whatever your ScriptAliased CGI directory exists" and locate the <Directory> tag directly below which includes a reference to "cgi-bin". It will look like the following when you first install Apache: <Directory "C:/Program Files/Apache Software Foundation/Apache2.2/cgi-bin"> then replace the directory path with the correct directory path to your php-cgi.exe directory (copy and paste the following over them if you like). This group will then look similar to the following after you have amended the first line:
Note: If you have previously installed PHP as apache's CGI handler, this might already be correctly modified in your .conf file. Also, this entry does not hinder your use of the module type installation in the case you find you may need to switch back and forth between PHP Apache Module and Apache-CGI installation modes (in my experience). Change 2) Move to the very end of the httpd.conf file. Find the last few entry lines which start and end with reference to being #PHP INSTALLER EDITS. These lines may be missing if you used the Non Thread Safe installer. (This step adds scriptalias, registers the .php extension and locates the Cgi Interpreter for Apache). And in either case, copy, paste and replace (or add) the following 5 lines so that they are the last and final instructions in your httpd.conf file. (Php 5.3.5 omits the AddType line. You don't need to add it here if you plan to add it to your .htaccess file.)
Apache Module edits for httpd.conf (to manually config httpd.conf):
If you have followed these steps correctly, your httpd.conf file modifications are now fine. If you are still having an errors, your problem is most likely the first issue refered to in our troubleshooter (page 7) guide. Make sure there are no # symbols infront of the two center lines when you reinstall or change your php configuration. Testing PHP 5.3.5 Installation Configuration:Testing your PHP 5.3.5 configuration: As previously mentioned, the first thing we do is re-start (or start) apache HTTP server so that Apache can now include any new configuration information. Apache should start without error. If you are unsure how to check or test your apache installation, or how to locate your home directory (the document root), please review the appropriate section(s) in our Apache Server 2.2.17 install guide. Those of you who have the apache icon in the system tray (see Fig. 11) can do this by selecting the apache feather logo icon and asking apache to restart. The green triangle/start button is displayed over the logo when Apache is in its serving state (review our apache guide if you cannot locate the icon but want to).
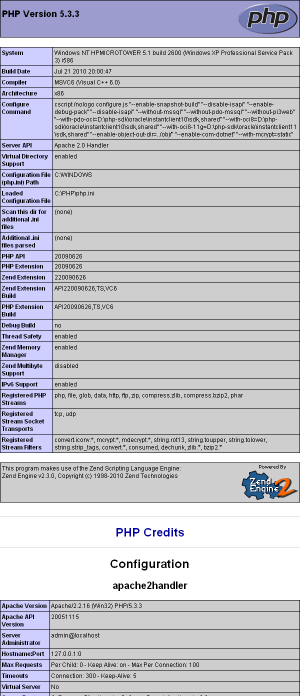
Those of you who encounter no issues here should now move directly into the final testing phase (Jump to troubleshooting if you have encountered a problem). Final Testing Phase: <?php Save this file in your Apache Document Root Folder (your home directory) as phpinfo.php Next we simply call the file in our web browser. For example, if your home setup is a local setup, you would simply type one of the following into the location bar and depress the enter key... http://127.0.0.1/phpinfo.php http://localhost/phpinfo.php This is the moment of truth that will tell you if you have been successful in your efforts and can now start to code in .php. If your .php script worked, you will be greeted with a bunch of data explaining your PHP 5.3.5 and server setup like so (Fig.12) (If you need to recall this file because it didnt work the first time, you might be re-calling a cached error version, to avoid this, rename the .php file each time you test it, eg; phpinfo01.php, phpinfo02.php, etc. Use our TroubleShooter page for more data!)...
You can also upload this small file to your www folder at your website to learn the configuration of your hosting site (if php is enabled on that website). After you have uploaded the file to your website, you would view the information by typing www.MySite.com/phpinfo.php into your browser location bar. We should note that your webhost may have PHP installed but has removed this configuration display feature. Your php.ini would have to state disable_functions = phpinfo to hide the feature. You may be able to save a file in you root directory called php.ini with: disable_functions = which may turn it on for you, else, contact the system admin (Note: If there already is an existing php.ini, you would append this data inside that file). This phpifo information is invaluable as a tool for checking or debugging various information as you load or add other items to your PHP configuration under Apache. The Website Admin can now easily re-enter the Options Selector page (Fig. 10) at any time to add or remove components via the Installation Change / Repair / Remove menu (You would of course select change). Gain access to the menu by restarting the .msi installation file or by using Add/Remove Programs in Windows Control Panel to change your PHP 5.3.5 items configuration. This phpinfo.php script will confirm a successful option installation by adding a corresponding section to the list using that options name as the new header. Bookmark this tutorial for future reference. Things to remember: When seeking to add to your installation, first ask do I need a threadsafe add-on or not? and secondly, will this add-on integrate correctly with my Apache-CGI setup or my Apache PHP Module or not? That is it! If you havent done so already, you can get professional standard 2011 PHP5 certification now. For under $15 per month (with a one year subscription), you can study at your own pace and plus you gain free access to a whole range of other website related certified courses like full Server, Office and Adobe selections etc. Study whatever you want, as much as you want. Or, and as a closing note, and again, if you have no previous formal PHP or MySQL training and would like to attain some solid Web Developer skills, then you would be smart to enroll now on this inexpensive self paced study course on basics as well as some advanced uses of PHP and MySQL with popular servers. Innobuzz also deliver unique advanced courses on Ethical Hacking and other Security courses which would be of interest to the technical minded. You are now ready to start coding your .php files and scripts. And remember to save your files with php script in them as .php, not .html. You would need to add an apache handler if you wanted to save them as .html. All that is left to do now is to fine tune your php.ini to better suit your needs. And this comes as par for the course while you learn to master your PHP. If you need it, troubleshooting is on the next page. Enjoy.
|
||
|
Copyright © 2011 Website Administration Services ™ Australia |

|
||||||||||||||||||